If you’re looking for a rewarding project that will test your skills and unleash your inner gunsmith, consider assembling your own firearm using a G19 parts kit. This kit includes all the necessary components, from the frame—the pf940c—to the slides, barrels, and other parts to assemble a full-sized Glock 19. With the right tools and a bit of patience, you can create a fully-functioning firearm that you can be proud of.
Why assemble your own gun?
There are several reasons why assembling your own gun can be a rewarding and fulfilling experience. Firstly, it allows you to tap into your inner gunsmith and test your skills. Building your own firearm from a G19 parts kit, such as the pf940c, gives you the opportunity to learn about the intricacies of gun mechanics and gain a deeper understanding of how your weapon functions.
Additionally, assembling your own gun can provide a sense of accomplishment and pride. Knowing that you were able to create a fully-functioning firearm with your own hands is an empowering feeling. It’s a tangible representation of your abilities and craftsmanship.
Another benefit of assembling your own gun is customization. When you purchase a pre-assembled firearm, you are limited to the features and specifications that are available from the manufacturer. However, with a G19 parts kit, you have the freedom to personalize your gun to suit your needs and preferences. From choosing the slide and barrel to selecting the sights and grips, you can create a firearm that is uniquely yours.
Furthermore, building your own gun can also be a more affordable option. While purchasing a complete firearm can be expensive, buying a G19 parts kit and assembling it yourself can save you money. This is especially true if you take advantage of an 80-lower option, which allows you to complete the remaining 20% of the lower receiver yourself.
In summary, assembling your own gun using a G19 parts kit offers a chance to challenge yourself, customize your firearm, and save money. It’s a fulfilling project that allows you to unleash your inner gunsmith and create a firearm that is truly your own.
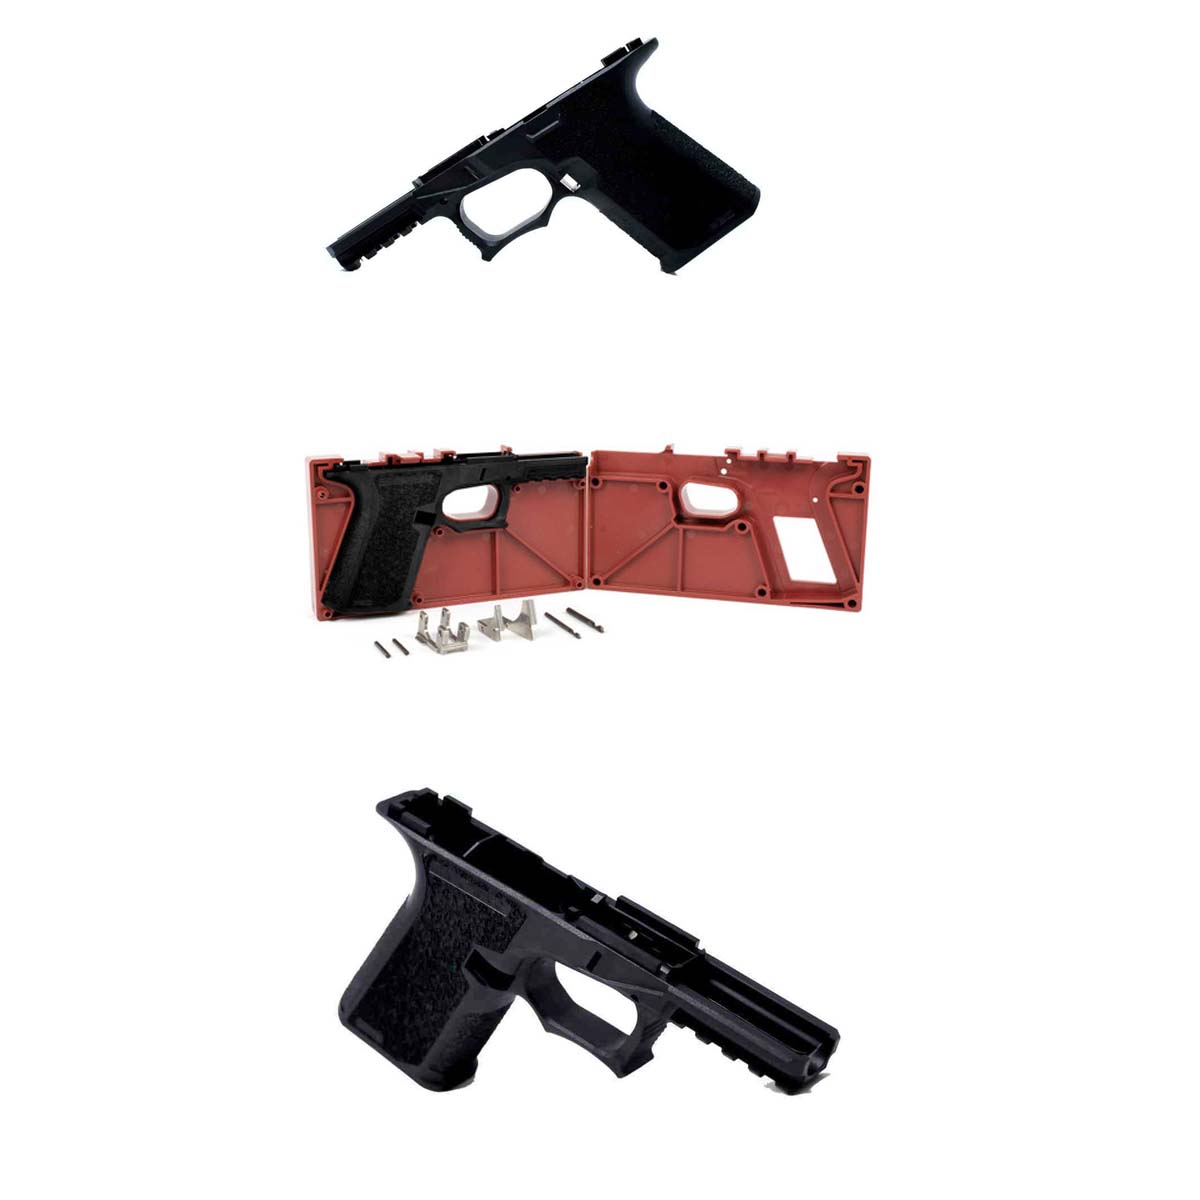
Understanding the G19 parts kit
The G19 parts kit is a comprehensive package that contains all the necessary components to assemble your own Glock 19 firearm. At the heart of the kit is the pf940c frame, which serves as the foundation for the entire build. This frame is a high-quality, polymer-based frame that closely replicates the dimensions and design of the original Glock 19 frame.
One notable advantage of the G19 parts kit is the option to utilize an 80-lower. An 80-lower refers to the remaining 20% of the lower receiver that requires completion by the end-user. This option allows for greater customization and personalization of your firearm, as you have the opportunity to shape and finish the lower receiver according to your preferences.
The kit also includes other crucial components such as the slide, barrel, and internal parts. These components are manufactured to exacting specifications, ensuring optimal performance and reliability. Whether you’re a seasoned gun enthusiast or a beginner, the G19 parts kit provides a user-friendly and straightforward assembly process.
It’s important to note that the G19 parts kit does not include any serialized components, such as the frame or the lower receiver. This means that you will need to comply with all federal, state, and local laws regarding the purchase, transfer, and assembly of firearms.
By understanding the contents of the G19 parts kit, you can confidently embark on your DIY firearm assembly project, knowing that you have all the necessary components to create a fully-functional Glock 19.
Preparing for assembly
Before diving into the exciting process of assembling your G19 frame, it’s important to take the time to prepare for the task ahead. This preparation will ensure that you have a smooth and successful assembly experience. Here are some essential steps to follow before starting your build.
First, gather all the necessary tools and equipment. This includes basic tools such as screwdrivers, punches, and pliers, as well as specific tools like an armorer’s wrench and sight pusher. Having all the required tools at hand will save you time and frustration during the assembly process.
Next, create a clean and organized workspace. Clear off a sturdy table or workbench and remove any clutter or distractions. Lay down a soft cloth or mat to protect the frame and parts from scratches. Keeping your workspace organized will prevent any confusion or loss of components during the assembly process.
Additionally, familiarize yourself with the assembly instructions. Whether you’re using a guide or watching an online tutorial, it’s crucial to have a clear understanding of each step before you start. Take the time to read through the instructions thoroughly, highlighting any areas that may be unclear or require additional attention.
Lastly, mentally prepare yourself for the task ahead. Building your own firearm is a detailed and precise process that requires patience and focus. Take a moment to visualize the end result and remind yourself of the satisfaction that awaits you once the assembly is complete.
By following these steps and adequately preparing for the assembly process, you’ll set yourself up for success and ensure a smooth and enjoyable build. So gather your tools, clear your workspace, familiarize yourself with the instructions, and get ready to unleash your inner gunsmith as you embark on this exciting DIY project.
Step-by-step guide to assembling your G19 frame
Now that you have all your tools and workspace ready, it’s time to dive into the exciting process of assembling your G19 frame. Here is a step-by-step guide to help you through the process:
1. Start by preparing your frame: Ensure the frame is clean and free from any debris or oils. Inspect it for any defects or imperfections before proceeding.
2. Install the trigger mechanism: Begin by inserting the trigger spring into the frame, followed by the trigger itself. Secure the trigger with the provided pins or screws.
3. Attach the slide stop: Slide the slide stop into its designated slot on the frame. Ensure that it is securely in place.
4. Install the locking block: Place the locking block onto the frame’s designated area and align it properly. Push it down firmly until it snaps into place.
5. Insert the rear rail module: Align the rear rail module with the corresponding slots on the frame. Gently press it down until it locks into position.
6. Install the magazine release: Insert the magazine release into its designated slot and secure it with the provided pins or screws. Make sure it moves freely without any obstructions.
7. Attach the slide and barrel: Slide the slide onto the frame, ensuring that the rails align correctly. Insert the barrel into the slide and lock it in place.
8. Install the sights: Depending on the type of sights you have chosen, follow the manufacturer’s instructions for installation. Use the appropriate tools to secure them onto the slide.
9. Test the functionality: Before considering your assembly complete, conduct a thorough function check. Test the trigger pull, slide action, and magazine release to ensure everything is working correctly.
Congratulations! You have successfully assembled your G19 frame using a parts kit. Now, it’s time to continue customizing and fine-tuning your firearm to make it truly yours. Enjoy the fruits of your labor and remember to always prioritize safety when handling firearms. Happy shooting!
Troubleshooting tips
Building your own firearm using a G19 parts kit can be a rewarding and exciting project. However, it’s not uncommon to encounter some challenges along the way. To help you troubleshoot any issues that may arise during the assembly process, here are some helpful tips:
1. Properly fit components: Ensure that all the components fit snugly together without any excessive play or wobble. If you encounter a loose fit, double-check that you have properly aligned and installed each part. You may need to disassemble and reassemble certain components to achieve a better fit.
2. Check for proper alignment: Pay close attention to the alignment of the frame, slide, and barrel. Misalignment can cause malfunctions or prevent the gun from firing properly. If you notice any misalignment, carefully adjust the components until they align correctly.
3. Address functionality issues: If you encounter issues with the trigger pull, slide action, or magazine release, try cleaning and lubricating the components. Sometimes, a simple cleaning can resolve functionality issues. If the problem persists, consult the assembly instructions or seek assistance from an experienced gunsmith.
4. Ensure safety: Safety should always be your top priority when handling firearms. If you experience any safety concerns during the assembly process or when test firing the gun, immediately stop and seek professional assistance. It’s better to be safe than sorry.
5. Seek guidance: If you’re facing persistent challenges or are unsure about a particular step, don’t hesitate to seek guidance. Reach out to fellow gun enthusiasts, consult online forums or instructional videos, or seek the advice of a qualified gunsmith. They can offer valuable insights and help you overcome any obstacles.
Remember, patience and persistence are key when troubleshooting. Stay calm, take your time, and don’t be afraid to ask for help. With the right approach, you’ll be able to address any issues and complete your G19 parts kit assembly successfully. Happy building!